Main Window
Overview
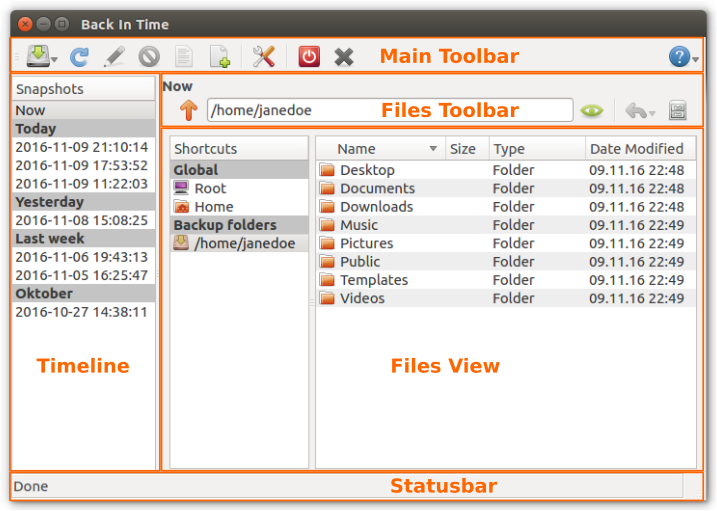
Main Toolbar
 Take Snapshot
Take a new Snapshot in background. The main window can be closed during taking the snapshot. Normal behavior is to only compare files size and modification time. Alternatively, you can take a new Snapshot with
checksumsoption enabled. This will calculate checksums for every file to decide if the file has changed. Taking a snapshot with checksums option takes a lot more time but it will make sure, the destination files won’t be corrupt. Refresh Snapshots List
Refresh the Snapshots in Timeline.
 Snapshot Name
Add a name for a Snapshot so you can easily identify it later. If
Don't remove named snapshotsin is enabled this will also prevent the Snapshot from being removed.If this button is grayed out you need to select a snapshot in Timeline.
 Remove Snapshot
Remove one or more Snapshots from Timeline.
Nowcan not be removed as this is no Snapshot but the live view of the local file-system.If this button is grayed out you need to select a snapshot in Timeline.
 View Snapshot Log
View the log of the selected Snapshot.
If this button is grayed out you need to select a snapshot in Timeline.
 View Last Log
View the log from the last snapshot attempt.
 Settings
Open Settings.
 Shutdown System after Snapshot has finished
Shutdown the computer and poweroff after a snapshot has finished. The main window must stay open for this. If shutdown is not supported on the system this button will be grayed out.
 Exit
ExitClose the main window. Running Snapshots will remain in background.
 Help
HelpMenu with links to this help, FAQ, report bugs…
Files Toolbar
 Up
UpGo to the parent folder.
 Show hidden files
Toggle hidden files (starting with a dot) to be shown in files view.
 Restore
Restore selected files or folders. This button has a sub-menu (hold down the button). Default action is
Restore.If this button is grayed out you need to select a snapshot in Timeline.
- Restore
Restore the selected files or folders to the original destination.
 Restore to…
Restore the selected files or folders to a new destination.
- Restore ‘/path’
Restore the currently shown folder and all its content to the original destination.
- Restore ‘/path’ to…
Restore the currently shown folder and all its content to a new destination.
 Snapshots
Open Snapshots Dialog.
Timeline
The Timeline lists all Snapshots which where already taken. You can browse them
to see its contents in right hand Files View. The first item Now is not
a Snapshot. It is a live view on the local file-system. It shows exact the same
as your normal file browser. Multi selection is possible to remove multiple
Snapshots altogether.
Files View
Depending on selection in left hand Timeline this will either show the
original files or the files in the selected snapshot. You can jump directly to
your home or include folders in Shortcuts.
Statusbar
Show current status. While a snapshot is running this will show a progress-bar
combined with current speed, already transfered data and the last message from
rsync.